GPS/Raspberry Pi Based stratum 0 Timeserver
The RPi GPS based time server
Abstract
In this work a combination of Raspberry Pi and GPS receiver is used in order to propagate an accurate time signal throw a local network by using the NTP protocol.
Time is obtain due the NMEA string from the GPS receiver, but this inaccurate time mark is tunned by using a PPS (pulse per second) associated to the GPS signal.
The necessary kernel and system modifications, and the preparation and configuration of the NTP package for use this GPS based time reference is exposed.
Finally, the NTP running in this GPS/Raspberry Pi aggregation is used as a reference time server for every host attached to the local network.
Motivation
An accurate time stamp for events is a usually requirement for scientific data acquisition. Since todays these type of data acquisition is delivered throw a computing system, this requirement about accurate time stamp is manifested by a accurate time computer system.
The natural way in that an accurate time is deliberated by a computer system (perhaps formed by many hosts) is the well known NTP protocol. Never the less, a NTP accurate computer time system needs a sternal reference: may be other (more time accurate) computer system or an external time signal…
These external time signal can typically be an atomic clock, a radio time-signal receiver or a GPS receiver with some special features.
Recently some guys from my local Astronomy Club are working in some data acquisition related to stars ocultations by asteroids. Due my interest in both Astronomy and Computing since, and that I Was look for a cool project for my new Raspberry Pi, I asked myself if could was possible to design a Raspberry Pi project to satisfies the requirement of my colleagues…
After some web surf the answer was yes.
GPS as time reference
A GPS connected to a computer is showed as a serial connection. A specific standard communication protocol called NMEA is the way used by the GPS stuff in order to send data to the computer. The computer see this data as an ASCII string send trow a tty device. The string is simply a comma separated data, as latitude, longitude… and also the time.
Never the less the time get from the NMEA data is so much inaccurate. For a solution for this issue, some (good) GPS receivers implement a PPS (pulse per second) mechanism. This mechanism get a very short pulse from the satellite GPS constellation. This pulse is launched every second with a big exactitude.
If the computer is capable of managing this PPS, then can combine both PPS signal and the NMEA data in order to get a very accurate time reference.
The magic stuff here is the “computer capable” related stuff. In order to make sure that the time data is really accurate, some characteristics are needed.
First of all, the GPS receiver need to be connected to the computer in a way that permit to the PPS signal to be capable to trigger a so called “hardware interrupt”.
A USB connection, is unable to do this. Never the less a PPS signal throw the USB port can be used, it is only capable of send a so called “software interrupt”. This type of interrupt can trigger a system call from the operating system. But this mechanism is unable to get the desired accurate. By using a USB connection to drive the PPS signal, perhaps you could get a similar accurate time signal to the one from a Internet connected, very distant NTP server… But this is not good enough for us. ;)
The traditional connection, capable to trigger a hardware interrupt from a PPS signal is the traditional, and now quasi obsolete, serial port. One of the pins of a serial connection (the pin 9) can be used for trigger a hardware interrupt.
In the Raspberry Pi and other similar hardware, with some software preparation, the very versatile GPIO can be used to trigger a hardware interrupt from a PPS signal. This is the stuff we will use…
The operating system to be used is important too. It must be capable for inserts hardware interrupts manager code, and to be able to manage internally the PPS signals in order to be used by user space software as a NTP server in the right way. Linux can do these stuff.
References and Status of the Art
There are some web references to the use of the GPS signal as accurate time source. Here, some comments about them:
AdafruitKernel: This site use a precompiled old version kernel, but speak about the ppstest command for testing purposes.
NTPServer: This site talk about the difficulties of the get an accurate time signal, and the roll of the PPS in this. It use the GPS receiver from Adafruit, and explains very clearly how to connect it to the Raspberry.
Stratum1NTP: The most interest of this pages lies in how to recompile the NTP software in a Debian way, so the system is maintained clean, because no software is installed “by hand”.
RPiGPSNTP: The strong point of this page is about how to modify the kernel for use the pps-gpio module in a Raspberry. It seems to be the more new page about Raspberry and GPS time based.
RPiKernel: This is the mean site for Raspberry Pi firmware an kernel. You need the code for do any thing…
AdafruitGPS: Here is the “Adafruit Ultimate GPS Breakout”, a versatile GPS receiver that will be used as our GPS. You can buy it here….
RefClock: Here is the list of NTP drivers. We will use the number 20 (generic NMEA).
Preparing the Raspberry Pi system
We will use Raspbian as Raspberry Pi O.S.. Assuming you have a usable Raspbian SD, we begin for upgrade the system. From now, I assume you was become root user in your system. For do this, open a console and type:
# sudo su
You should need a notable amount of disk space. A 8GB SD should be enough space. A 4GB SD can be used if you remove all the desktop environment stuff by do (credits: RemoveDesktop):
# apt-get remove xserver* x11-common x11-utils x11-xkb-utils \
x11-xserver-utils xarchiver xauth xkb-data console-setup xinit lightdm \
libx{composite,cb,cursor,damage,dmcp,ext,font,ft,i,inerama,kbfile,klavier,\
mu,pm,randr,render,res,t,xf86}* lxde* lx{input,menu-data,panel,polkit,\
randr,session,session-edit,shortcut,task,terminal} obconf openbox gtk* \
libgtk* scratch tsconf desktop-file-utils

# apt-get --yes autoremove

# apt-get --yes autoclean

# apt-get --yes clean
In any case, please remember to resize the filesystem to maximun amount of space provided by the SD.
Now, the very first job to do is to update/upgrade the system. For this, type:
# apt-get update
and, after the process ends:
# apt-get upgrade
and accept the suggestions… only for be sure, you can also type:
# apt-get dist-upgrade
In my case, after upgrade the system, the kernel version installed was
3.6.11+ This can be confirmed by the uname -r command.
The Linux kernel version installed is important since only the 3.6.xx or higher have some necessary characteristics. Note: really, some of the very last 3.2.xx releases have these characteristics, too. But, any way, is always a good idea use the last kernel release.
A singularity of the Raspbian O.S. is that (for now) the Linux kernel is packet on the same package that the boot firmware, so the kernel packages for the Raspbian is not used: it use the kernel associated with the boot firmware…
Kernel recompilation and installation
IMPORTANT UPDATE: Seems that recompile the kernel is not necessary. See update notes for April 2015 at bottom.
When the last kernel version of Raspbian was installed, you will should download the kernel source an recompile it with the necessary modifications.
For download the kernel, you have two possibilities:
1- Go to RPiKernel and press the “zip” button, for download it in a compress format. Uncompress it.
2- Get the source from git with the command:
# git clone --depth 1 git://github.com/raspberrypi/linux.git
Now, install the libncurses5-dev and bc packages; it is
necessary in order to use a a friendly method to configure the kernel
and run some scripts:
# apt-get install libncurses5-dev

# apt-get install bc
Go into the directory of the kernel source…
# cd linux
Some clean, only for sure:
# make mrproper
The next step is configure the kernel:
# zcat /proc/config.gz >.config
In this manner, the configuration of the actual running kernel are used as base for the new configuration.
Now we will to make some changes in the new kernel configuration. For this, execute:
# make menuconfig
This open a friendly menu for modify kernel configuration. Thanks to we had used the actual running kernel configuration as default for the new one, so we only must done a few changes. These are:
General setup/Local version - append to kernel release –> Add here some string for label your new kernel, as for example
-ppsgpio.Device Drivers/PPS support/PPS support –> Mark it as module
Device Drivers/PPS support/PPS client using GPIO –> Mark it as module
When finish, save the new kernel configuration with the suggested default name (.config) and exit.
The next stuff is modify some kernel source. The config done enables a generic PPS-GPIO support, but some hardware specific is necessary for enable the GPIO related stuff and specific the GPIO pin to use is necessary.
This kernel source modification are done in the
arch/arm/mach-bcm-2708/bcm2708.c file.
These is the diff for these changes, as is published in RPiGPSNTP: NOTE: Be away to be tempted by download the patched file from somewhere: probably it will not match your current kernel version and all will be a crap. You shloud edit YOUR file and modify following this diff mark.
--- bcm2708.c.0 2013-02-15 11:08:40.497566132 -0600
+++ bcm2708.c   2013-02-15 12:34:58.782693974 -0600
@@ -55,6 +55,7 @@
 #include <mach/system.h>

 #include <linux/delay.h>
+#include <linux/pps-gpio.h>

 #include "bcm2708.h"
 #include "armctrl.h"
@@ -64,6 +65,19 @@
 #include <linux/broadcom/vc_cma.h>
 #endif

+/* PPS-GPIO platform data */
+static struct pps_gpio_platform_data pps_gpio_info = {
+   .assert_falling_edge = false,
+   .capture_clear= false,
+   .gpio_pin=18,
+   .gpio_label="PPS",
+};
+
+static struct platform_device pps_gpio_device = {
+   .name = "pps-gpio",
+   .id = -1,
+   .dev = { .platform_data = &pps_gpio_info },
+};

 /* Effectively we have an IOMMU (ARMVideoCore map) that is set up to
  * give us IO access only to 64Mbytes of physical memory (26 bits).  We could
@@ -708,6 +722,7 @@
    bcm_register_device(&bcm2708_vcio_device);
 #ifdef CONFIG_BCM2708_GPIO
    bcm_register_device(&bcm2708_gpio_device);
+   bcm_register_device(&pps_gpio_device);
 #endif
 #if defined(CONFIG_W1_MASTER_GPIO) || defined(CONFIG_W1_MASTER_GPIO_MODULE)
    platform_device_register(&w1_device);
Now we can compile the new kernel. The process take a very long time (about 8 hours) so, assumig you are connect to your Raspberry by ssh, you could desire to logout and turn off your PC while your Raspberry make the job. For this, you can use this command (remenber: from the root directory of the kernel source):
# nohup make > foo.out 2> foo.err < /dev/null &
In this manner, you can logout and simply wait 8-10 hours… After this time, you can connect again and continuing the job.
You can check that the compilation has finished using the command:
# ps aux |grep make
When the compilation is already is runnig you get something like this:
root      6655  0.0  0.3   4188  1544 ?        S    21:45   0:00 make
root      7294  0.1  0.4   4480  1888 ?        S    21:46   0:01 make -f scripts/Makefile.build obj=kernel
root      8758  1.0  0.1   3552   812 pts/0    S+   22:01   0:00 grep make
When the compilation has finished, the previous command should return only the last line (or none).
You also can check that the file foo.out don’t change for a time.
Patiently waits for the completion of the compilation…
WARNING: backup your actual kernel now:
# cp /boot/kernel.img /boot/kernel.img.bak
The next steep if installing the news modules and copy new kernel to /boot with the commands:
# make modules_install
# cp  arch/arm/boot/zImage /boot/kernel.img && sync
For advanced users, you can use other name for your new kernel and make
the necessary changes in the /boot/config.txt file….
Now is a good time for reboot your Raspberry Pi and test that the new kernel is running by type:
# uname -r
This should return the current kernel version with your personal sufix (that you added at the config step)…
Some System Tuning
Some miscellanea modifications are necessary. These list was gets from NTPServer:
1- File /boot/cmdline.txt: free the tty at boot time (please note that
for me the root partition is the /dev/mmcblk0p2 one. Could be it was
different for you if you use some other installation method (as for
example, NOOBS).
# Remove these in cmdline.txt:
# `console=ttyAMA0,115200`
# and `kgdboc=ttyAMA0,115200`.
# Mine looks like this:

dwc_otg.lpm_enable=0 console=tty1 root=/dev/mmcblk0p2 rootfstype=ext4 elevator=deadline rootwait
2- File /etc/inittab: some lines must be removed/commented the
default tty configuration.
#Spawn a getty on Raspberry Pi serial line
#T0:23:respawn:/sbin/getty -L ttyAMA0 115200 vt100
3- Automatically making links in /dev/: make new file in
/etc/udev/rules.d/ (for example: 80-gps-to-ntp.rules with these
contents:
# Change MODE of ttyAMA0 so it is readable by NTP and provide a symlink to
# /dev/gps0
KERNEL=="ttyAMA0", SUBSYSTEM=="tty", DRIVER=="", SYMLINK+="gps0", MODE="0666"
# Symlink /dev/pps0 to /dev/gpspps0
KERNEL=="pps0", SUBSYSTEM=="pps", DRIVER=="", SYMLINK+="gpspps0", MODE="0666"
4- We will force the new pps-gpio module to be loaded at boot time. For
this, add a new line to the /etc/modules file with the command:
echo 'pps-gpio' >> /etc/modules
Now, we can reboot the Raspberry Pi. After boot, the new kernel should be used and the pps-gpio module loaded. This can be show with:
# uname -a
Linux raspberrypi 3.6.11ppsgpio+ #1 PREEMPT Tue Mar 5 05:59:05 CET 2013 armv6l GNU/Linux
# lsmod |grep pps
pps_gpio                2124  0
pps_core                7254  1 pps_gpio
For ends the system related configuration, the pps-tools should be installed, for future debug and tests:
# apt-get install pps-tools
NTP package modifications
As show in RPiGPSNTP and
Stratum1NTP, the original NTP
package must be recompiled. The best way to “reconstruct” the original
package as show in Stratum1NTP.
After install the build-dep package, get the NTP source package (is
a good idea to do all work in a ad-hoc made directory):
# apt-get source ntp
We now edit the file ntp-4.2.6.p5+dfsg/debian/rules and locate the
line in witch the ./configure script is invoked, so we can add the
configuration options --enable-linuxcaps --with-NMEA --with-ATOM.
It is a good practice to change the package version, so you can use the
standard package tool for manage it. For this, edit
ntp-4.2.6.p5+dfsg/debian/changelog and add some lines like these
(adapt it to your case):
ntp (1:4.2.6.p5+dfsg-3~pps1) unstable; urgency=low

  * Support to PPS. See http://ntpi.openchaos.org/pps_pi/ and
        http://mythopoeic.org/pi-ntp/

 -- Ruben Diez-Lazaro <xxxxx@gmail.com>  Mon, 25 Feb 2013 18:15:40 +0100
Now, go in the ntp-4.2.6.p5+dfsg and reconstruct the package (this
process takes about 25 minutes):
# dpkg-buildpackage -b
And, for last, the command
# dpkg -i ../ntp_4.2.6.p5+dfsg-3~pps1_armhf.deb
(please note the path pointing to the directory where the package was construed), will install (or replace) the NTP package.
You probably want that in successive system updates the ntp package
you modified was not replaced by another updated version, undoing your
work. To avoid this, you should put the ntp in hold state. This
can be done by the command:
# echo ntp hold | dpkg --set-selections
And, for avoid the installation of a new (un modified) kernel version:
# echo raspberrypi-bootloader hold | dpkg --set-selections
The GPS stuff and how to connect to the Raspberry
There are some GPS receivers available for connect to the Raspberry Pi. In general, avoid user-end receivers GPSs unless you want to hack it. The most suitable GPS receiver for our purpose (and, in general for every homemade GPS project) is [AdafruitGPS][Adafruit Ultimate GPS Breakout], from Adafruit industries. It can be used in a easy way and the newer version (3) has external antenna support and Pulse-Per-Second output. You can also consider to buy a uFL to SMA connector adapter, so you can use a standard GPS external antenna (usually with a SMA connector) with the GPS receiver (with an uFL antenna connector). So you can get out the external antenna throw your window instead all the receiver…
How to connect it to the Raspberry is well explained at NTPServer, but Be careful!! we will follow the advice from RPiGPSNTP and use the GPIO pin 18 instead the 23 one, so in this manner all the GPIO pins used are continuous and we can use a better suitable connector for the Raspberry GPIO.
The necessary connections between the Adafruit Ultimate GPS Breakout (version 3) and the GPIO is like this:
GPS     RPI
---     ---
RX  --> TXD
TX  --> RXD
PPS --> GPIO #18
GND --> GND
VIN --> 5V0
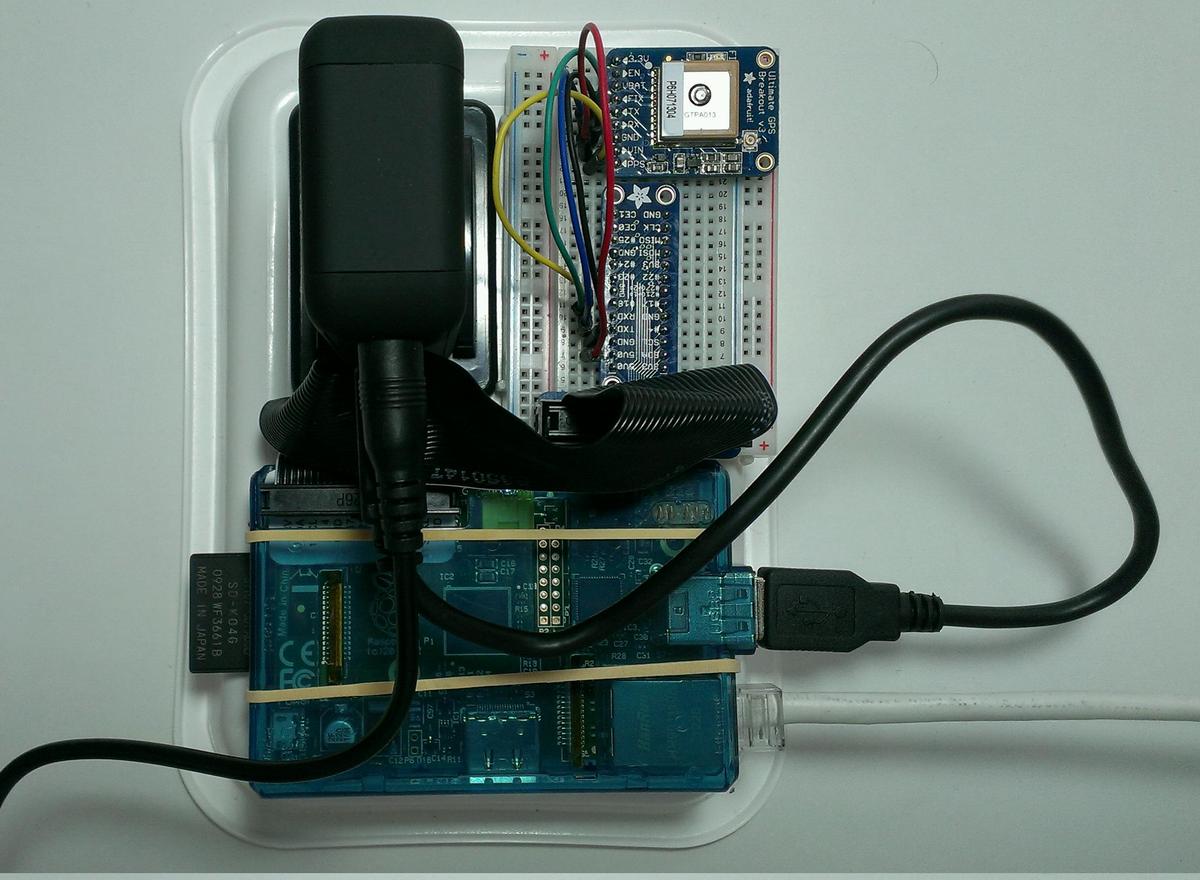
For make the connections in an easy way, you can use a breadboard and a “Adafruit Pi T-Cobbler Breakout” from Adafruit industries.
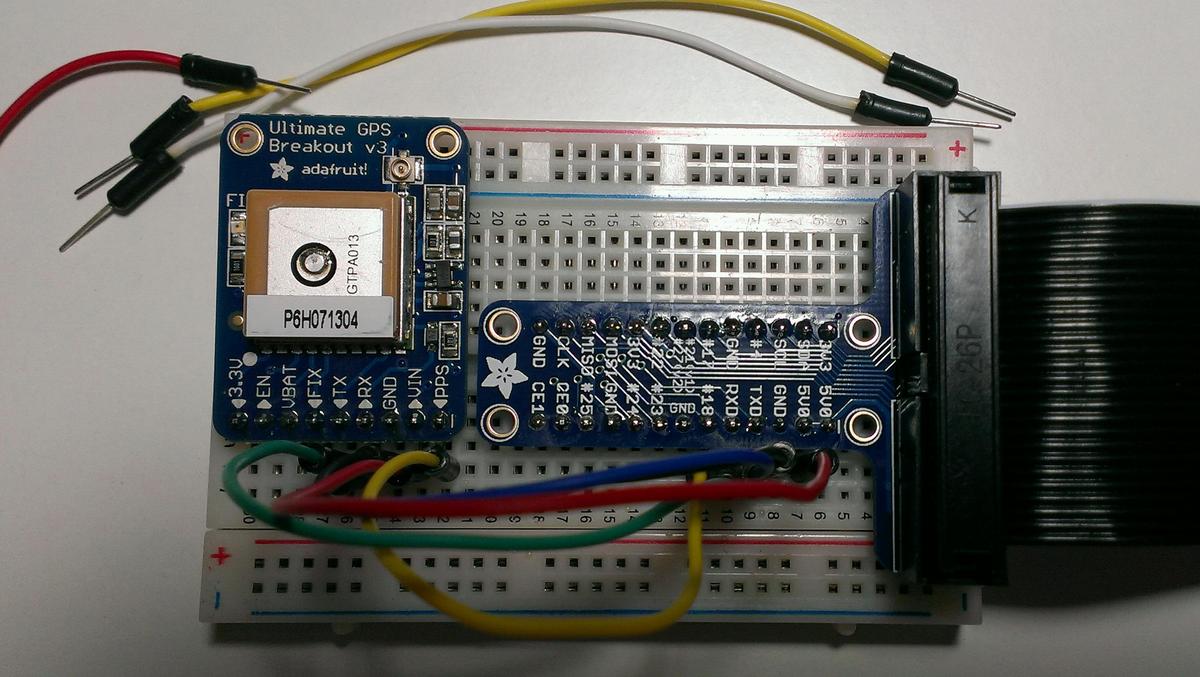
GPS mounted in a breadboard
If you have an older version of the Adafruit Ultimate GPS Breakout, without PPS output, you can get if directly from the receiver chip as explained at NTPServer
Once you connect this mount to the Raspberry, turn on the system and use the ppstest command for tests if the system is receiving a suitable PPS signal (note: the GPS receiver musts be linked to the satellites, so perhaps you must wait some minutes for it). You should obtain some like this:
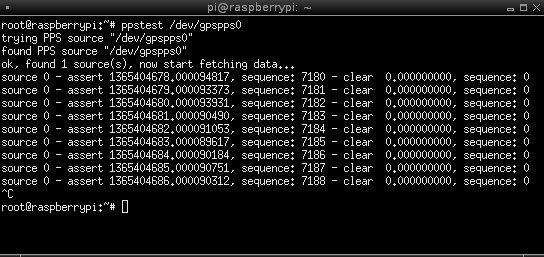
Testing the PPS signal
Configuring the NTP stuff for use the GPS as time font
The NTP server use different “drivers” for manage time fonts. These drivers are specified by use reserved IPs as time servers. A complete documentation of these drivers are found in RefClock.
Some possibilities for use the GPS receiver as a time clock exist, but the very best is the used by RPiGPSNTP: use the GPS_NMEA NTP driver (127.127.20.x).
For use this driver, edit the /etc/ntpd.conf and add these new
lines:
server 127.127.20.0 mode 16 prefer
fudge 127.127.20.0 flag1 1 time2 0.400
And change the lines:
restrict -4 default kod notrap nomodify nopeer noquery
restrict -6 default kod notrap nomodify nopeer noquery
by these others.
restrict -4 default kod notrap nomodify nopeer
restrict -6 default kod notrap nomodify nopeer
For some details about why the 0.400 value for time2 parameter was
selected, please see RPiGPSNTP
Now you can restart the NTP service by type:
# /etc/init.d/ntp restart
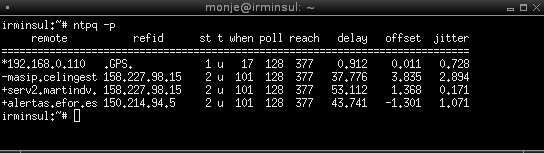
You can test that all are right from the NTP point of view by using the
ntpq -p command. After some time, you should obtain some like this:
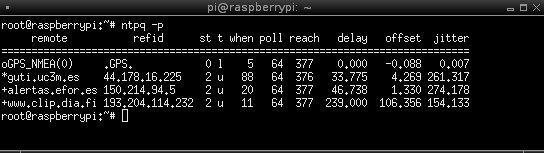
Testing NTP driver
Please note that you can must to wait some time for this output. You can read about the meaning of this output in RPiGPSNTP
Configuring the NTP stuff for server the time across the local network
If the NTP in the host connect to the GPS receiver (The Raspberry in our case) is configured as showed, this host will expand the NTP time signal throw the local network, so any other computer attached to the local network can use the GPS time server as reference.
For do this, edit the /etc/ntp.conf file of the client and locate
some lines of the form server xxxxxx, where xxxxxx is the name
of each preconfigured time servers (or pools of timeservers). Near these
lines, we must put a similar one pointing to our GPS based timeserver.
Assuming our timeserver has the local ip 192.168.0.110, this new
added line will be:
server 192.168.0.110
After restart the NTP service in the client and wait some minutes for NTP stabilization, we can view how the new time reference is present:
NTP client
Please note that these values are taken from a standard 100Base-T wired LAN. If a wifi connection if used, these values will be more of 100 times worse… You are advised!!
Criticisms and possible improvement
Some notes and possible improvements must be commented.
First of all, from the hardware point of view, you must note that in the Raspberry Pi (model B), the Ethernet controller lies over the USB one; and this is bad. In general, USB is a very versatile way to get/send data… but very inefficient. A “real” Ethernet controller directly attached to the SPI data bus would be more efficient, and the time signal propagated over the local network from the time server must be more accurate. As show in the “Other notes” section of RPiGPSNTP, you can do it… but is a more advanced Raspberry Pi project. Perhaps, if you simply need a more accurate time server, you can consider use another board just with a more efficient Ethernet controller. In any way, if you use the Raspberry as a GPS based time server for your local network, avoid attach USB devices to it, for prevent overload that perhaps affects to the Ethernet performance.
Some of the data from the NMEA stuff is irrelevant for our purposes, so you can tunning the amount of data that the GPS device send and get a little more performance. More about this point in the “Unit calibration” section from NTPServer.
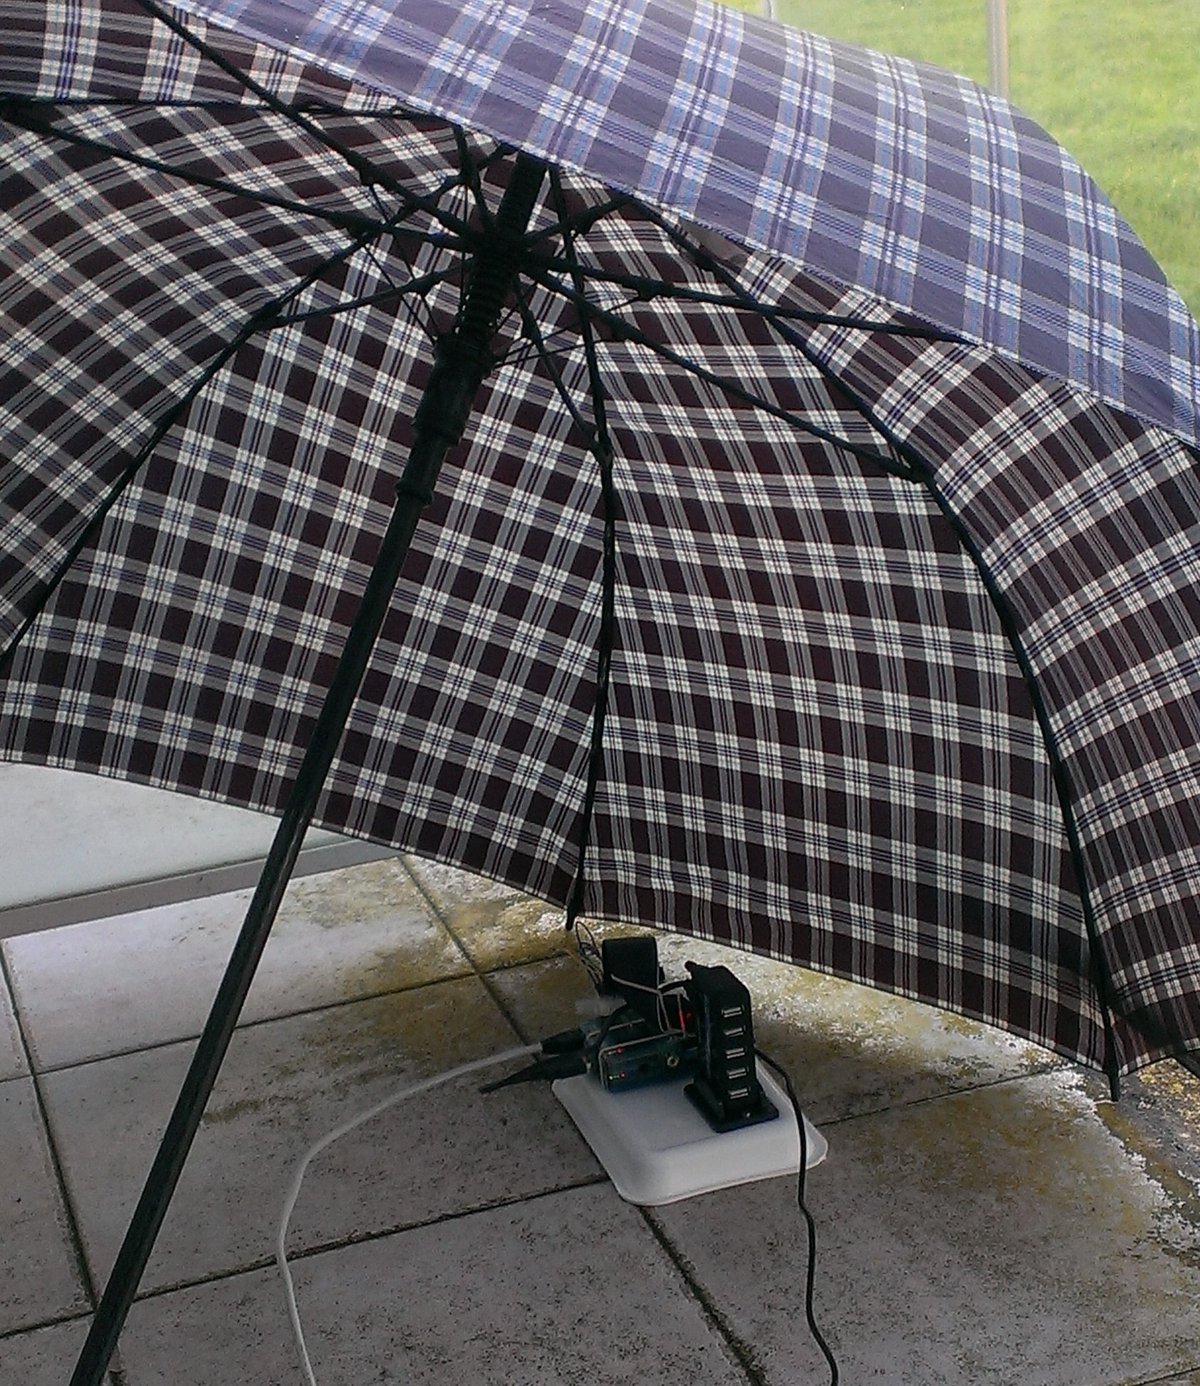
For the probes of the system, I must put it out my window in order to get a GPS signal from the satellites. You can avoid this by attach and GPS antenna to the GPS receiver and put it outside. The Ultimate GPS Breakout version 3 from Adafruit has a u.FL connector for external active antenna, but please not that these antenna usually have a SMA type connector, so you must use an adapter. See the description of the Ultimate GPS Breakout in the Adafruit page for details.
The used NTP configuration both in the server and client side is a very quick one. You can surely tune both of them for better performance.
Conclusions
This was a nice Raspberry Pi first project and I hope that it will be useful to the guys from my local astronomy club, who needs an accurate time signal for some observations. I hope too this can helps to other people that like to get other scientific data with an accurate time reference.
For a better time reference performance, get your data directly from the GPS based time server hosts instead from a client in the local network. This is not always possible, of course…
Please, please, please: avoid the use of wifi connection for connect the time server and the client. Use only wired LAN connections to get a better time signal (about 100-500 times better) on the client.
The NTP stuff is based on statistics. So you must use some timeservers and not only one. This serve as backup if one of them fails. The NTP software is able to take into account the different accurate of all them. You can use too the also called “pools of time servers”: the specified time server in the NTP configuration file is in reality a few of them; the system can select the more adequate real server of the pool for you…
As said, the NTP stuff is based on statistics, so you would wait some minutes (about a hour or so) for the NTP signal stabilization before to use it as reference.
You can tune the system, of course: this work is only a first approximation to the problem of get and accurate clock.
Testing the RPi GPS based time server
UPDATE (OCTOBER 2014)
I have rebuild my GPS based time server by using a more updated Raspbian
SO. I used 2014-09-09-wheezy-raspbian with original kernel version
3.12.28+, updated to 3.12.30 after the process.
This SO should by compatible with all Raspberry Pi models A, B, Bv2 and B+.
The construct proced is quite similar. Some detected differences:
The
bcm2708.cfile is now different. But you can patch it in a similar manner.The kernel compilation takes now about 10 hours.
The commands before provided by the
build-deppackage is now done by thedpkg-devone and is yet installed in Raspbian by default, so you probably don’t need to install nothing for get them.Some dependences issues with the
dpkg-buildpackagecommand. For avoid them, do:apt-get install autotools-dev debhelper libedit-dev libcap2-dev libssl-dev autogenBy defauld, now no source repository is activated. You should add to the
/etc/apt/sources.listthe line:deb-src http://mirrordirector.raspbian.org/raspbian/ wheezy main contrib non-free rpiafter this, you should run the commandapt-get updatefor update the available packages database.
BTW, some errors were corrected and some aclarations were added…
You can download a working GPS NTP Stratum0 ready image
The MD5SUM code for this zip file is
527d359163297f44421deb93bf62904f and for the uncompressed image file
is f0882178d88745d53165f6aea7a4757b
You can “burn” this image to a SD card in the usually way:
# dd bs=8225280 if=2014-10-24-wheezy-raspbian-GPS_ntp_ready-kernel3.12.30-staticIP192.168.0.250.img of=/dev/mmcblk0; sync
or similar. Please also note that this image is configured with a static
IP: 192.168.0.250: you should edit the file
/etc/network/interfaces for adapt to your local network scheme.
The defaul user is the usually one: pi with password raspberry.
By the way, you will need a SD card with at least 4GB in size. Please
note that nevertheless the size of the root file system is quite
conservative, so don’t forget increase it to the maximum of your SD
card, for example by using the raspi-config utility after boot your
Raspberry Pi.
For more information about how to “writing an image to the SD card”, please refer to the official raspberrypi.org site
Thanks to Hugo González for testing and suggestions.
UPDATE (April 2015)
Ludovic Levet send me a mail telling that for kernels version 3.18.3+ or higher there is NOT necessary compiling the kernel in order to enable GPIO pin #18 for PPS usage.
Due kernel version 3.18.3+ or higher have enabled Device Tree support,
you can tell the kernel that GPIO pin #18 will be used as PPS signal
input simply by editing /boot/config.txt file and add the line:
dtoverlay=pps-gpio,gpiopin=18
For more information about kernel Device Tree, Ludovic suggest the url DeviceTree.
Ludovic also indicate that for kernels before 3.18.3+, nor is it
necessary compiling. For these old kernels, it is sufficient to edit the
file /boot/cmdline.txt and add to the end of the file:
bcm2708.pps_gpio_pin=18
Ludovic Levet also suggest a way to improve the Ethernet latency (the
weak point of the Raspi) by add to the /boot/cmdline.txt the line:
smsc95xx.turbo_mode=0
Thanks you very much, Ludovic Levet: I owe you a beer…
Contact
If you have any comment or correction, please feel free for send me a
e-mail about anything that you consider interesting at monje314-2005
at yahoo dot es.
Cheers!!!