ATTENTION: software overpassed notice.
The pySQM software is overpassed by «tesstractor».
Please don’t use pySQM for new setups. Use tesstractor instead.
Tesstractor is a software designed to read data from TESS photometers (http://tess.stars4all.eu/).
This software reads data also from Unihedron SQM-LU photometers.
You can find the tesstractor software at https://github.com/guaix-ucm/tesstractor
OBSOLETE – Unattended Sky Quality Meter Station (V3).
OBSOLESCENCE WARNING
This implementation for an unattended SQM station is now obsolete and I do not recommend its use.
My work about unatended Raspberrypi SQM unatended station is based in two principles:
1 - Mount a remote network based filesystem for store SQM data. 2 - A script periodically executed by cron service that ensures that the PySQM is running and the remote filesystem is mounted.
The implementation of these two points was done a long time ago using the Raspbian version of that time.
Now that version is obsolete and the current one (stretch) uses a new administration tool called “systemd”. With this tool, it is possible implement both points 1 and 2 in a very easy, reliable and secure way… May be a day I will find time to do it…
But any way, my old solution is now obsolete and I do not recommend its use.
If, for study purposes, you want to consult the old and now obsolete documentation, here is it:
Generalities
Unattended station concept…
The idea is to have a 24/7 computer with a SQM attached and serve data to some centralized site. Due the price, size and electrical consumption of this computer is a important facet, a Raspberry Pi based station becomes a attractive solution
The Unattended station should be these characteristics:
Should be small and have low power consumption.
The software should run without human interaction.
The station should be robust: the recovery under fails mush be automated.
It must server data to a remote storage, accessible too from the data-agregator organization (as Red española de estudios sobre la contaminación lumínica).
The station should notify administrative information, as a recovery or any detected problem. Mail seems to be the natural mechanism for this.
The system should be remotely accessible for maintenance and configuration: SSH and router port redirection are your friends ;)
Pieces of the Puzzle.
Hardware platform Raspberry Pi, of course :D
As main software PySQM from REECL: “PySQM the UCM open source software to read, plot and store data from SQM photometers” Nievas Rosillo, Miguel and Zamorano Calvo, Jaime (2014) UCM eprint (PDF).
SQM. The USB model (SQM-LU) is the more suitable, due the hardware/software combination chosen.
Cloud storage. Should have some characteristics that limit the possibilities:
Must be acceded by the Raspberry Pi, following a independent, standard method. WebDav protocol for remote file system mount is a natural solution.
The Red española de estudios sobre la contaminación lumínica acts as data-aggregator. It uses a DropBox based cloud storage. DropBox client does not run in Raspberry Pi (it is released as a binary client, which has not support for ARM architecture).
Due these two previous two points, a interface between local mounted remote storage and final DropBox storage is required. This concept is named ``Cloud Storage Broker’’. After some tests, Storage Made Easy service was selectioned. It can be mounted from Raspberry Pi by WebDav protocol and can syncronize the data with DropBox (among others storage services).
The final cloud-stored (DropBox) data must be accessible throw a direct link (not by an user interacting with a web. Happily, DropBox can do this.
Administrative resources for mail notifications and file share administration. gmail.com and web administration interface from selected storage service were chosen.
For the impatient: downloadable disk system image template
You can implement your own Raspberry Pi unattended SQM data collector by download a image template
The MD5SUM code for this zip file is
7e34fecfc57fa28db0a4510c87747fa0 and for the uncompressed image file
is 90e355d499f15ec70bf99833cd8c7427
You can “burn” this image to a SD card in the usually way:
# dd bs=8225280 if=2015-08-25-wheezy-raspbian-PySQM_ready-kernel4.1.6-staticIP192.168.0.251.img of=/dev/mmcblk0; sync
or similar. Please also note that this image is configured with a static
IP: 192.168.0.251: you should edit the file
/etc/network/interfaces for adapt to your local network scheme.
The default user is the usually one: pi with password raspberry.
By the way, you will need a SD card with at least 4GB in size. Please
note that nevertheless the size of the root file system is quite
conservative, so don’t forget increase it to the maximum of your SD
card, for example by using the raspi-config utility after boot your
Raspberry Pi.
For more information about how to “writing an image to the SD card”, please refer to the official raspberrypi.org site
Once the image was burned into a SD card, you mus edit the files in order to adapt it to you case:
/etc/network/interfaces: Adapt it to you network scheme./etc/profile.d/sqm_environment.sh: Fix here theSQM_NAMEvariable for for related mail information stuff./etc/nail.rc: Use here your gmail user and password. Also, at the end of the file, put the mail directions forerrormailandinfomaildefined aliases./home/pi/.davfs2/secrets: Put here yourStorage Made Easyuser and password./etc/fstab: Modify for match your data directory name in yourStorage Made Easyaccount./home/pi/SQM/config.py: Modify as explained inPySQMdocumentation./srv/www/index.html: The dummy web page for monitoring purposes.
Known issues: Changes you should make in the downloaded image
After upload the previous pre-configured SD image, check following issues that had been discovered. You should fix them after burn the SD from the pre-configured image for avoid problems…
At present time, all known issues are reflected in the system image template.
Setup details: how you can make it
Get account in gmail.com, eu.storagemadeeasy.com and dropbox.com
For the proposed solution, a account in
gmail.com,
eu.storagemadeeasy.com and
dropbox.com should be created. gmail.com
is needed for notification stuff and as base for create the account in
eu.storagemadeeasy.com and dropbox.com.
eu.storagemadeeasy.com is a cloud storage broker service that have some interesting characteristics:
The storage space can be mounted in a standard manner by using the
webdavprotocol. This avoid the use of third part protocols used by others cloud storage services, asDropBoxand similar.Acts as a cloud storage broker. This is: you can syncronize the data inside Storage Made Easy with some other cloud storage services, as `DropBox’, which is the one used by REECL.
Loggin in the eu.storagemadeeasy.com page and create a folder named
DropBox. Inside, create another folder for store your SQM data. For
example, we will use a folder with the name OAF-SQM01 (inside the
DropBox folder). Also, add your DropBox account as
cloud provider and config the syncronization of the folder
DropBox in Storage Made Easy with the DropBox account…
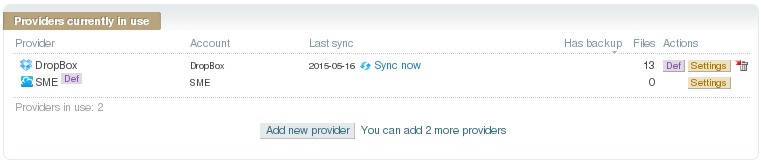
This screenshot show the DropBox account is associate to a subfolder in the Storage Made Easy service:
SME provider
And this one show configuration details for data syncronitation whith
DropBox. Please note that use trash for deleted files should be
disabled for avoid show some spurious file names in DropBox:
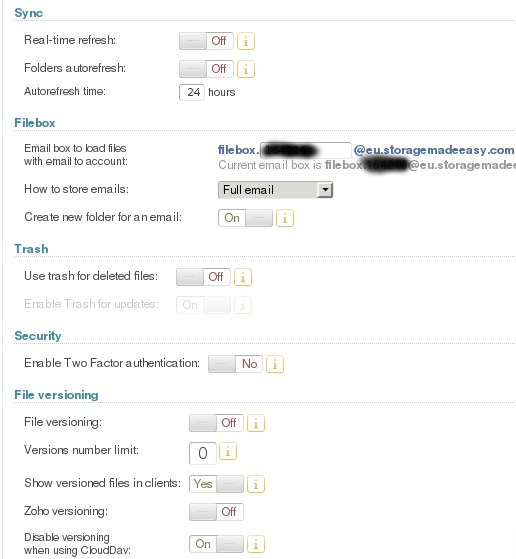
SME configuration
Finally, the data is available in DropBox:
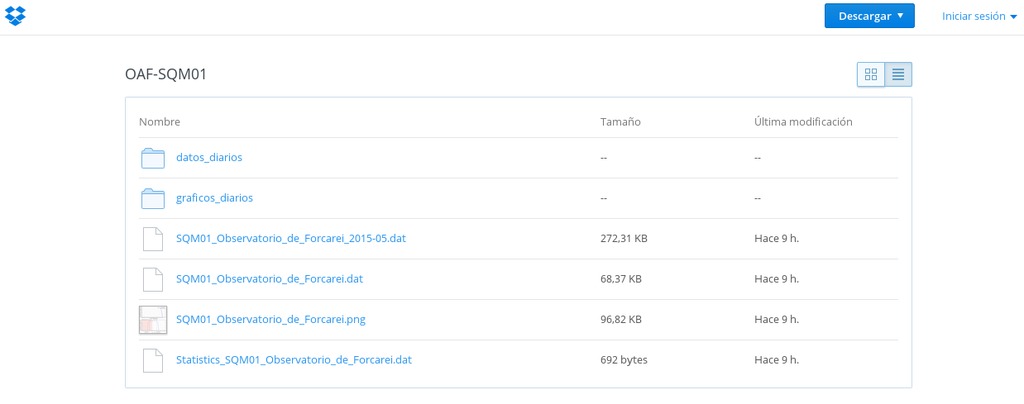
DropBox data
Prepare a system image
We will use Raspbian as Raspberry Pi O.S.. You can download the latest Raspbian image and make you SD by follow this instructions.
Assuming you have a usable Raspbian SD, we begin for upgrade the system. From now, I assume you was become root user in your system. For do this, open a console and type:
$> sudo su
You could remove all the desktop environment stuff and get more disk space by do (credits: RemoveDesktop):
$> apt-get remove xserver* x11-common x11-utils x11-xkb-utils \
x11-xserver-utils xarchiver xauth xkb-data console-setup xinit lightdm \
libx{composite,cb,cursor,damage,dmcp,ext,font,ft,i,inerama,kbfile,klavier,\
mu,pm,randr,render,res,t,xf86}* lxde* lx{input,menu-data,panel,polkit,\
randr,session,session-edit,shortcut,task,terminal} obconf openbox gtk* \
libgtk* scratch tsconf desktop-file-utils
In any case, please remember to resize the file system to maximum amount of space provided by the SD.
Now, the very first job to do is to update/upgrade the system. For this, type:
$> apt-get update
and, after the process ends:
$> apt-get upgrade
and accept the suggestions… only for be sure, you can also type:
$> apt-get dist-upgrade
For clean the downloaded package, do:
$> apt-get --yes autoremove

$> apt-get --yes autoclean

$> apt-get --yes clean
A singularity of the Raspbian O.S. is that (for now) the Linux kernel is packet on the same package that the boot firmware, so the kernel packages for the Raspbian is not used: it use the kernel associated with the boot firmware…
You can update the kernel/firmware with the command:
$> rpi-update
Install and configure mail
A easy (but not so secure) manner for configure a mail system in the
Raspberry Pi for use a external account is installing the
heirloom-mailx package:
$> apt-get install heirloom-mailx
Edit the file /etc/nail.rc and add at the end some configuration and
alias definitions:
#QMS stuff

#Account
set smtp-use-starttls
set ssl-verify=ignore
set smtp=smtp://smtp.gmail.com:587
set smtp-auth=login
set smtp-auth-user=YOURUSER@gmail.com
set smtp-auth-password=YOURPASS
set from="YOURUSER@gmail.com (Friendly Name)"

#Alias
alias infomail \
mymail@gmail.com \
mail1@example.com \
mail2@example.com

alias errormail \
mymail@gmail.com \
mail3@example.com \
mail4@example.com \
mail5@example.com
Execute now some commands due (really weak) security considerations:
$> chown root.mail /etc/nail.rc
$> chown 640 /etc/nail.rc
$> usermod -a -G mail pi
Note that the new group for user pi take effect only since the next
login (as user pi).
Install and configure davfs
The necessary package for mount the cloud storage by using the
webdav protocol must be installed:
$> apt-get install davfs2
During the installation, you will be prompted about permit webdav mounts to unprivileged user: You should answer “Yes” to this question.
After this, this line must be added this line to the file
/etc/fstab:
https://webdaveu.storagemadeEasy.com/DropBox/OAF-SQM01 /home/pi/SQM/data davfs _netdev,rw,user,noauto,uid=1000,gid=1000,file_mode=644 0 0
Please note that this line assume that the folder OAF-SQM01 was
created throw the eu.storagemadeeasy.com web interface. Some other
name could be used, at your choice.
Now, as user pi, create the directory /home/pi/.davfs2/ and
inside it the file /home/pi/.davfs2/secrets whit this content:
/home/pi/SQM/data "YOURUSER@gmail.com" "YOURSMEPASSWORD"
And, for security reasons, do:
$> chmod 600 /home/pi/.davfs2/secrets
An slow and/or transitory network issues can produce some error that
could be minimized by edit the file /home/pi/.davfs2/davfs2.conf and
set the option use_locks to 0 (use_locks 0). Credits about
this.
Also, PySQM suffers a very poor
input/output performance, which produce a bottleneck that results in a
high consumption of bandwidth when cloud storage is used. For avoid this
issue, add to the end of the file /home/pi/.davfs2/davfs2.conf the
lines:
use_locks 0
cache_size 128

[/home/pi/SQM/data]
## saving bandwidth:
## 10 minutes delay in file and dir refresh...
file_refresh    600
dir_refresh     600
## 10 minutes delay upload. Hope this save bandwidth
delay_upload    600
Please note that in this example, use_locks and cache_size are
general options for all possible davfs2 mounted filesystem, but the
other ones only affect to the filesystem mounted under
/home/pi/SQM/data.
Installation and configuration of PySQM
Lets go with the core of the system: the PySQM software, developed
by the Jaime Zamorano team and that can be found at its
page.
From the project web page: “PySQM the UCM open source software to read, plot and store data from SQM photometers” Nievas Rosillo, Miguel and Zamorano Calvo, Jaime (2014) UCM eprint (PDF).
Installing necessary dependences.
Assuming you are using a SQM-LU model, install the necessary dependences
by running, as root these commands:
$> apt-get install python-pip

$> apt-get install python-matplotlib

$> apt-get install ttf-bitstream-vera

$> apt-get install python-dev

$> pip install pyephem
Please note that some other dependences, as python-serial and
python-numpy should be yet installed in the default Raspbian
distribution. Also note that the default Raspbian distribution have
installed various python versions, but the default one is the 2.7: that
is the required version by PySQM.
There is a little change about matplotlib stuff that you should to
in order to use the library in a not interactive way: Edit the file
/etc/matplotlibrc and change the line:
backend : TkAgg
by this one:
backend : Agg
A little hack for avoid certain aesthetics issues due a bug in one of
the matplotlib related packages (about the fonts path used).
$> cd /usr/share/fonts/truetype

$> ln -s lyx ttf-lyx
Also, lets to get permission to read the port associate to the SQM-LU to
the user pi. This is done by the command:
$> usermod -a -G dialout
Note that the new group for user pi take effect only since the next
login (as user pi).
Download and configure PySQM
As user pi, in its home, make a new directory named SQM and go
into it:
$> cd; mkdir SQM; cd SQM
All the follow stuff in this section will be made into this
/home/pi/SQM. Lets to download the PySQM software from
PYSQM. It can be done directly by
the command:
$> wget http://guaix.fis.ucm.es/sites/default/files/luminica_files/PySQM.tar.gz
and uncompress it:
$> tar -xvzf PySQM.tar.gz
some other directories should be create for future work:
$> mkdir data logs
In our working directory (/home/pi/SQM) should be appears a file
named config.py. Edit it. As a primer step, this line should be
added immediately after the very first one… So the two very first
lines of this file should be:
#!/usr/bin/env python
# -*- coding: utf-8 -*-
This not avoid the programmer’s advice: “Non-ASCII characters are not supported in the config.py file”. But, at least, permit you to use utf-8 characters into the coments… :D
In the rest of the this file (config.py) you must configure your
particular configuration, observatory name, position, etc…
In _device_addr you should put _device_addr = '/dev/ttyUSB0' if
you are using a SQM-LU. By the way, we are using UT as system time, so
its related variable should be _computer_timezone = 0. About the
variable _local_timezone you should use the timezone for where your
system is configured. For UTC, it should be: _local_timezone = 0
About the path for data store, it should point to the same directory
where you mount the webdav cloud storage. This is:
monthly_data_directory = "/home/pi/SQM/data" You can maintain the
defaults for the others path…
Main script
Script /home/pi/SQM/data/unattended_sqm.sh:
As user pi, you must create the following script:
#!/bin/bash

. /etc/profile.d/sqm_environment.sh

PYSQMPATH="$(dirname $0)"

CLOUDSTORAGEPATH="${PYSQMPATH}/data"

LOGFILE="${PYSQMPATH}/logs/unattended_sqm.log"

PYSQMOUT="${PYSQMPATH}/logs/pysqm.stdout"

PYSQMERR="${PYSQMPATH}/logs/pysqm.stderr"

MOUNTCHECK="mountpoint -q ${CLOUDSTORAGEPATH}"

PYSQMCOMMAND="python -m pysqm"

## Use timeout command to avoid conection issues
MOUNT_TIMEOUT=90

MOUNT_PID_FILE="/var/run/mount.davfs/$(echo ${CLOUDSTORAGEPATH} |sed 's/^\///' |sed  's/\/$//' |sed 's/\//-/g').pid"

VALID_PROCESS_STATUS=("S" "R")

_MSG="$(date -R -u): ${SQM_NAME}"

function killpysqm {
   for i in $(pgrep -f -x "${PYSQMCOMMAND}"); do
      kill -TERM $i; wait
      # just in case:
      kill -KILL $i
   done
}

function execpysqm {
   cd ${PYSQMPATH}
   nohup ${PYSQMCOMMAND} >>${PYSQMOUT} 2>>${PYSQMERR} < /dev/null &
   MSG="======> ${_MSG} --> STARTING PROCESS"
   echo ${MSG} >>${PYSQMOUT}
   echo ${MSG} >>${PYSQMERR}
   MSG="PID = $(pgrep -f -x "${PYSQMCOMMAND}")"
   echo ${MSG} >>${PYSQMOUT}
   echo ${MSG} >>${PYSQMERR}
}

function checkpysqm {
   # first, check for bad state process and kill them
   for i in $(pgrep -f -x "${PYSQMCOMMAND}"); do
      _STATUS=$(ps h o state p $i)
      _VALID="NO"
      for _ITEM in ${VALID_PROCESS_STATUS[*]}; do
           [[ "${_STATUS}" == "${_ITEM}" ]] && _VALID="YES"
      done
      if [ "${_VALID}" == "$NO" ];then kill -KILL $i; fi
   done; wait

   NUMOFPYSQM=$(pgrep -c -f -x "${PYSQMCOMMAND}"); wait

   if [ "${NUMOFPYSQM}" == "0" ]; then
      execpysqm
      MSG="${_MSG} --> Starting: \"${PYSQMCOMMAND}\"."
      echo "$MSG" >>$LOGFILE
      echo "$MSG" |mail -v -s "${_MSG}: Starting" infomail
   elif [ "${NUMOFPYSQM}" == "1" ]; then
      MSG="${_MSG} --> \"${PYSQMCOMMAND}\" already running."
      echo "$MSG" >>$LOGFILE
   else
      killpysqm
      MSG="${_MSG} --> Terminating: too many \"${PYSQMCOMMAND}\" processes."
      echo "$MSG" >>$LOGFILE
      echo "$MSG" |mail -v -s "${_MSG}: Terminating" errormail
   fi
}

### BEGIN

${MOUNTCHECK}
if [ $? -ne 0 ]; then
    # if exist a pid file, delete it:
    rm -f ${MOUNT_PID_FILE}
    timeout ${MOUNT_TIMEOUT} mount "${CLOUDSTORAGEPATH}"
    ${MOUNTCHECK}
    if [ $? -ne 0 ]; then
        MSG="${_MSG} --> ${CLOUDSTORAGEPATH} mount failed."
        echo "$MSG" >>$LOGFILE
        echo "$MSG" |mail -v -s "${_MSG}: Mount Failed" errormail
        killpysqm
    else
        MSG="${_MSG} --> ${CLOUDSTORAGEPATH} mount successfully."
        echo "$MSG" >>$LOGFILE
        echo "$MSG" |mail -v -s "${_MSG}: Mount successfully" infomail
        checkpysqm
    fi
else
    MSG="${_MSG} --> ${CLOUDSTORAGEPATH} already mounted."
    echo "$MSG" >>$LOGFILE
    checkpysqm
fi

sync
This file must be made executable by using the command:
$> chmod u+x unattended_sqm.sh
Script /root/bin/check_ip.sh:
As user root, you must create first the directory:
$> mkdir /root/bin
and then create the following script (/root/bin/check_ip.sh) inside:
#!/bin/bash

. /etc/profile.d/sqm_environment.sh

LOGFILE=${SQMDIR}/logs/check_ip.log

_DATE=$(date -R -u)
## Use timeout command to avoid conection issues
_TIMEOUT=3
# An array for list external ip service discovers to probe
_IPSERVICES=('http://ipecho.net/plain' 'http://ipv4.icanhazip.com' 'http://ifconfig.me/ip')

for _USEDIPSERV in ${_IPSERVICES[*]}; do
   NOWIP=$(timeout ${_TIMEOUT} wget -qO- ${_USEDIPSERV}); wait
   if [ ! -z "$NOWIP" ]; then break; fi
done
if [ -z "$NOWIP" ]; then
   NOWIP=unset
   _USEDIPSERV=none
fi

if [ "${NOWIP}" == "${EXTERNAL_IP}" ]; then
   echo "${_DATE} from ip discover: ${_USEDIPSERV} --> External IP unchanged: ${EXTERNAL_IP}" >>${LOGFILE}
   sync

else
   echo "This file contains the last detected external IP" >${LASTIPFILE}
   echo "Dont edit by hand" >>${LASTIPFILE}
   echo "${_DATE} from ip discover: ${_USEDIPSERV}" >>${LASTIPFILE}
   echo >>${LASTIPFILE}
   echo "${NOWIP}" >>${LASTIPFILE}
   sync

   echo "${_DATE} from ip discover: ${_USEDIPSERV} --> New external IP detected: ${NOWIP}" >>${LOGFILE}
   sync
   echo "${_DATE}: RaspberryPi ${SQM_NAME} --> New external IP (discover: ${_USEDIPSERV}) detected: ${NOWIP}"| mail -v -s "RasPi ${SQM_NAME} new external IP - ${_DATE}" errormail

fi

exit 0
This file must be made executable by using the command:
$> chmod u+x check_ip.sh
Using cron for do the system (reasonable) fault tolerant
For a (reasonable) fault tolerant mechanism, lets use cron for
periodically run the above scripts. As i before said, it check if all is
right, and re-run the stuff if it is necessary.
As root, the files /etc/cron.d/unattended_sqm and
/etc/cron.d/check_ip must be created with the following content:
File /etc/cron.d/unattended_sqm
SHELL=/bin/sh
PATH=/usr/local/sbin:/usr/local/bin:/sbin:/bin:/usr/sbin:/usr/bin

## SQM: unattended_sqm
## Every 10 minutes
*/10 *   * * *  pi      /home/pi/SQM/unattended_sqm.sh
File /etc/cron.d/check_ip
SHELL=/bin/sh
PATH=/usr/local/sbin:/usr/local/bin:/sbin:/bin:/usr/sbin:/usr/bin

## SQM: check_ip
## Every 6 hours
0    */6 * * *    root      /root/bin/check_ip.sh
Once created, restart cron with the command:
$> /etc/init.d/cron restart
Log subsystem
The main scripts generates log files. These files could grow
indefinitely, so the logrotate utility can be used for avoid this
stuff. For this, create, as root two files named
/etc/logrotate.d/unattended_sqm and /etc/logrotate.d/check_ip
with the contents:
File /etc/logrotate.d/unattended_sqm
/home/pi/SQM/logs/unattended_sqm.log {
       daily
       rotate 8
       delaycompress
       compress
       noolddir
       missingok
}
/home/pi/SQM/logs/pysqm.stderr /home/pi/SQM/logs/pysqm.stdout {
       weekly
       rotate 4
       delaycompress
       copytruncate
       compress
       noolddir
       missingok
}
File /etc/logrotate.d/cheick_ip
/home/pi/SQM/logs/check_ip.log {
       weekly
       rotate 4
       delaycompress
       compress
       noolddir
       missingok
}
Tasks on start up and halt
At this point, we must do that some tasks become to automatically be made at system start up and halt. These tasks should be:
At start up:
Notify the system start up and its external ip address
Initiate the main script
At system halt:
Notify the system halt
Dealing with the clock at boot time
The Raspberry Pi have not a real internal clock (RTC), so when it is
powered of the time recorded in the last shutdown is re-established
Nevertheless in a few seconds the ntpd stuff do its work and the system
become in time, the use of the recorded time at shutdown at the very
early boot time can be a crap. But if we can a network available, the
system cat be request a more accurate time at network interface up. This
time is not accurate, but is very better that use the recorded time at
shutdown. For do this stuff, simply install the ntpdata package by
using the command:
$> apt-get install ntpdate
Defining environment variables
Create the file /etc/profile.d/sqm_environment.sh with the following
content:
## SQM environment

export LASTIPFILE=/tmp/last_ip.txt

export SQMDIR=/home/pi/SQM/

export SQM_NAME="OAF-SQM01"

if [ -f ${LASTIPFILE} ]; then
   EXTERNAL_IP=$(grep -o '[0-9]\{1,3\}\.[0-9]\{1,3\}\.[0-9]\{1,3\}\.[0-9]\{1,3\}' ${LASTIPFILE} |tail -1)
fi
if [ -z "$EXTERNAL_IP" ]; then EXTERNAL_IP=unset; fi
export EXTERNAL_IP
The rc.local file
Edit the file /etc/rc.local. some extra content must be added at the
end of the file. The total content of the file will be as follow:
#!/bin/sh -e
#
# rc.local
#
# This script is executed at the end of each multiuser runlevel.
# Make sure that the script will "exit 0" on success or any other
# value on error.
#
# In order to enable or disable this script just change the execution
# bits.
#
# By default this script does nothing.

# Print the IP address
_IP=$(hostname -I) || true
if [ "$_IP" ]; then
  printf "My IP address is %s\n" "$_IP"
fi

## Begin of SQM stuff:
/root/bin/check_ip.sh
. /etc/profile.d/sqm_environment.sh

_DATE=$(date -R -u)

# The -v (verbose) flag ensure send entire message before the command return
su -c "echo \"${_DATE}: RaspberryPi ${SQM_NAME} data collector powered on with external IP: ${EXTERNAL_IP}\"| mail -v -s \"RasPi ${SQM_NAME} POWERED ON - ${_DATE}\" errormail; wait" pi

su -c /home/pi/SQM/unattended_sqm.sh pi

wait
## End of SQM stuff

exit 0
Ensure that this file have permissions -rwxr-xr-x and root as
owner.
The rc.local.shutdown file
A new file /etc/rc.local.shutdown must be created with the content:
#!/bin/sh -e
#
# rc.local
#
# This script is executed at the end of each multiuser runlevel.
# Make sure that the script will "exit 0" on success or any other
# value on error.
#
# In order to enable or disable this script just change the execution
# bits.
#
# By default this script does nothing.

## Begin of SQM stuff:

. /etc/profile.d/sqm_environment.sh

_DATE=$(date -R -u)

# The -v (verbose) flag ensure send entire message before the command return
su -c "echo \"${_DATE}: RaspberryPi ${SQM_NAME} data collector shutdown.\"| mail -v -s \"RasPi ${SQM_NAME} SHUTDOWN - ${_DATE}\" errormail; wait" pi

wait
## End of SQM stuff:

exit 0
Ensure that this file have permissions -rwxr-xr-x and root as
owner.
Modifying and active the rc.local service
The actual rc.local service must be modified for the new scheme.
Edit the file /etc/init.d/rc.local for become content this stuff:
#! /bin/sh
### BEGIN INIT INFO
# Provides:          rc.local
# Required-Start:    $all
# Required-Stop:     $all
# Default-Start:     2 3 4 5
# Default-Stop:      0 1 6
# Short-Description: Run /etc/rc.local and /etc/rc.local.shutdown if it exist
### END INIT INFO


PATH=/sbin:/usr/sbin:/bin:/usr/bin

. /lib/init/vars.sh
. /lib/lsb/init-functions

do_start() {
        if [ -x /etc/rc.local ]; then
                [ "$VERBOSE" != no ] && log_begin_msg "Running local boot scripts (/etc/rc.local)"
                /etc/rc.local
                ES=$?
                [ "$VERBOSE" != no ] && log_end_msg $ES
                return $ES
        fi
}

do_stop() {
        if [ -x /etc/rc.local.shutdown ]; then
                [ "$VERBOSE" != no ] && log_begin_msg "Running local boot scripts (/etc/rc.local.shutdown)"
                /etc/rc.local.shutdown
                ES=$?
                [ "$VERBOSE" != no ] && log_end_msg $ES
                return $ES
        fi
}

case "$1" in
    start)
        do_start
        ;;
    restart|reload|force-reload)
        echo "Error: argument '$1' not supported" >&2
        exit 3
        ;;
    stop)
        do_stop
        ;;
    *)
        echo "Usage: $0 start|stop" >&2
        exit 3
        ;;
esac
After this, for the change do effect, we must do:
$> /usr/sbin/update-rc.d -f rc.local remove
$> /usr/sbin/update-rc.d rc.local defaults
Wake up a dummy service for external monitoring (optional)
The system is reasonably robust but, what about the possibility of a
network failure?. In this case, is not possible for the system to notify
the failure from inside the local network. For be possible this notify
of network failure you can enable a dummy service and monitoring it from
outside the local network using, for example, a service as
uptimerobot.com.
The best option is wake up a very light web server and serve a dummy
page. My personal preference as light web server is webfs. For
installing it:
$> apt-get install webfs
After this, create a directory for store the dummy web page and put the appropriate permissions/owner:
$> cd /srv
$> mkdir www
$> chown www-data. www
Inside this new directory (/srv/www), put a index.html file with
a dummy content (for example, information about the system and URLs of
shared data)
Fix the adequate permissions/owner for this file:
$> chmod 644 index.html; chown www-data. index.html
For last, you must fix some configuration stuff in /etc/webfsd.conf
file. The lines I changed for my case were:
web_root="/srv/www"
web_port="1180"
web_index="index.html"
After these changes, restart the webfs service:
$> /etc/init.d/webfs restart
Once a dummy web page is available, you can create an account in
uptimerobot.com for monitoring and report issues.
Please note: in this example dummy web service I am using the port
number 1180. You can use whatever you like, but in order to become
the service available from outside your local network, you should
configure your router for redirect the incoming packages to port
1180 to the local IP which the SQM data collector station is
configured.
Perhaps, you also should do a similar redirection if you want to use the
SSH' access service from outside your local network. As a suggestion, you can change thesshdport and thepi`
user password…
Physical deployment of the SQM and begin of operations
The built prototype was installed in the “Observatorio Astronómino de Forcarei (OAF)” (Astronomical Observatory of Forcarei).
In the next image, we can see the look of the installed prototype (after take the picture, the support was updated using metalic clamps). The Raspi is inside the building. Note that only three wires are connected to the Raspi (power, network, USB) and only one of them (the USB wire that connec with the SQM) must cross the wall.
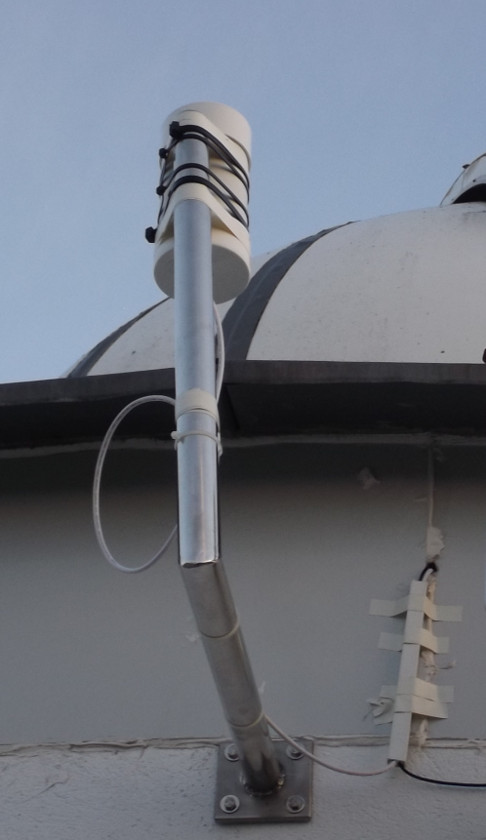
The SQM station
The data :D
The data can be browsed by share the DropBox (final cloud storage)
data directory. As example for our case you can show the data in this
URL:
https://www.dropbox.com/sh/spze9pleyvg2kjs/AADtv1UDcFBCTtUOrH9Vr0h7a?lst
It is also possible get the wole data file in zip format throw the
URL:
https://www.dropbox.com/sh/spze9pleyvg2kjs/AADtv1UDcFBCTtUOrH9Vr0h7a?dl=1
And also, from you account in DropBox you can share the URL of the
generated graphic. In my case this image can be acceded throw the URL:
https://www.dropbox.com/s/rw5lvwb80b18r5o/SQM01_Observatorio_de_Forcarei.png?raw=1
By using this URL, the image can be embedded in any web page, as for example:
http://rdlazaro.info/sqm/
Chagelog since system deployment
Before May 2015
Time configuration parameters.
In the first release, the time related parameter were (due my country is in the +1 timezone):
_computer_timezone = +0
_local_timezone = +1
But, if you configure your Raspi for use UTC time (as i do), these parameters should be:
_computer_timezone = 0
_local_timezone = 0
According to the PySQM main author, the parameter
_computer_timezone is not used in recents versions (is a legacy
parameter) and _local_timezone controls how the time axis is labeled
in the graphics (hours un UTC, UTC+1 and so on).
Change of cloud storage provider and use a broker.
In a early stage PowerFolder service was
used as primary cloud storage, but file access from davfs2 was
disabled by PowerFolder staff. Strange behavior was detected when
accessing the files generated by PySQM in the file system mounted
with the WebDAV protocol using davfs2.
If you editing (eg using nano or vim) or you read (using eg
cat or less) them, their contens was corrupted, and the data
record and graphics generation fails.
But it you don’t “touch” the files from the Raspi, the stuff works right.
This behavior is produced, according PowerFolder staff, because some
html access method related to the webdav protocol were disables
by security reasons at PowerFolder server side.
PowerFolder staff claims that them expect add the davfs2 client to
a “white list” that should permit a complete functionality when
webdav filesystem is mounted from Linux… in 2 or 3 months (since May
2015).
Due these issues, the primary cloud storage system was changed to Storage Made Easy
Currently, PowerFolder staff claims the issue is resolved, but anyway, PowerFolder service is not yet used.
May 2015
Join the `REECL SQM Network’ .
At May 2015, the Unattended Sky Quality Meter Station mounted at Forcarei obsevatory becomes join the REECL SQM Network.
As commented before, the PowerFolder service produced some problems. Looking for an alternative, we found the Storage Made Easy cloud storage service. This storage service can be mounted by using the webdav protocol as described before in this document. But this storage service have NOT the other desired characteristics (basically, the use of directs links for share contents). However, Storage Made Easy have a surprising capability that compensates this deficiency: some other cloud storage (as for example, DropBox) can be associate to Storage Made Easy accound and synchronize the stored files whith the associate external cloud storage.
So the Storage Made Easy service was used for mount in the Raspi the remote data storege, and a DropBox account was also associate with the Storage Made Easy contents. So the data can be acceded throw a DropBox account.
After these changes, we fulfill all requirements for join the REECL SQM Network.
August 2015
Bandwidth consumption issue.
PySQM is a nice software, but it was not designed with performance in
mind. It suffers a very poor input/output performance, which produce a
bottleneck that results in a high consumption of bandwidth when cloud
storage is used. For avoid this issue, you must tunning the
davfs2' stuff by add the file/home/pi/.davfs2/davfs2.conf` these
lines:
[/home/pi/SQM/data]
## saving bandwidth:
## 10 minutes delay in file and dir refresh...
file_refresh    600
dir_refresh     600
## 10 minutes delay upload. Hope this save bandwidth
delay_upload    600
December 2015
Some system tuning was made. I hope some of them avoid the issue about
remote (davfs2) filesystem “frozen”…
Logrotate (and other stuff) runs now during the day.
In an usual system, logrotate runs during the night, but due the nature of the SQM measurements, this was changed it to running during the day. We hope that this avoid a possible system overload in the middle of the SQM data recording…
Really, ALL processes scheduled at night were rescheduled at day.
For do it, chage the file /etc/crontab from its original (only
relevant lines showed):
17 *    * * *   root    cd / && run-parts --report /etc/cron.hourly
25 6    * * *   root    test -x /usr/sbin/anacron || ( cd / && run-parts --report /etc/cron.daily )
47 6    * * 7   root    test -x /usr/sbin/anacron || ( cd / && run-parts --report /etc/cron.weekly )
52 6    1 * *   root    test -x /usr/sbin/anacron || ( cd / && run-parts --report /etc/cron.monthly )
to:
17 *    * * *   root    cd / && run-parts --report /etc/cron.hourly
25 12   * * *   root    test -x /usr/sbin/anacron || ( cd / && run-parts --report /etc/cron.daily )
47 12   * * 7   root    test -x /usr/sbin/anacron || ( cd / && run-parts --report /etc/cron.weekly )
52 12   1 * *   root    test -x /usr/sbin/anacron || ( cd / && run-parts --report /etc/cron.monthly )
Use a RAM based file system as cache for davfs2:
Create the mount point /home/pi/.davfs2/cache_tmpfs (as user pi)
and add this line to /etc/fstab (edit it as user root):
tmpfs /home/pi/.davfs2/cache_tmpfs tmpfs rw,size=384M,nr_inodes=5k,noexec,nodev,nosuid,uid=1000,gid=1000,mode=1700 0 0
Mount it and change the cache path at /home/pi/.davfs2/davfs2.conf
(cache_dir) parameter. You must also remount the remote filesystem.
Increase the cache size and number of entries for files.
These are fixed by the parameters cache_size and table_size in
the /home/pi/.davfs2/davfs2.conf file.
After all these changes, the /home/pi/.davfs2/davfs2.conf looks as:
use_locks 0
cache_size 256
table_size 4096
cache_dir ~/.davfs2/cache_tmpfs

[/home/pi/SQM/data]
file_refresh    600
dir_refresh     600
delay_upload    600
Contact
If you have any comment or correction, please feel free for send me a
e-mail about anything that you consider interesting at monje314-2005
at yahoo dot es.
Cheers!!!